Table of Contents

Tuesday, January 31, 2012

Chicken Pot Pie

When I was growing up, we never had Chicken Pot Pie. Oddly, somehow, I had a craving for it a while back. This recipe I found on the website simplerecipes, and it is pretty good. I made some minor changes, but it is a really tasty recipe! I broke down and purchased those instant biscuits for the top crust--it was much simpler than making pie dough from scratch and it tasted just delicious!

The best way to have this is to roast a chicken and have that as a separate meal. The next day, you can strip all of the remaining chicken off the bone, and use it for this Chicken Pot Pie. Take what's left of the chicken and make stock out of it.

The easiest way to prepare this dish is to use an oven-proof ceramic pot. I have one from Le Creuset which is a 3.5 quart round French Oven. This way you can stir fry all the ingredients you need place your biscuits right on top and pop it in the oven.

If you don't have an oven proof pot, you will have to do it the hard way! The more complicated way would be to prepare all of the ingredients. Then whip up 2 pie crusts. Place the first pie crust on the pan. Add a pie bird and all the ingredients. Place the second crust on top. Wash with butter and pop it into the oven.

Ingredients
1 whole chicken, roasted (around 3.5 lbs), meat separated and shredded
2 homemade pie crusts (one for top and bottom) or homemade biscuits or instant biscuits

Filling
6 tablespoons butter
1 large onion, diced (about 1.25 cups)
3 carrots, sliced
3 celery stalks, sliced
1/2 cup all purpose flour
2.5 cups homemade chicken stock
1.5 cups milk
1 teaspoon fresh thyme leaves
1/4 cup dry sherry
3/4 cup green peas (frozen or fresh)
2 tablespoons minced fresh parsley
2 teaspoons salt
1/2 teaspoon fresh ground pepper


Preheat oven to 400 F.

In your oven proof pot, melt the butter. Add onions, carrots, celery and cook until the onions are translucent, about 10 minutes.


Add the flour and cook, stirring, for about 1 minute.


Whisk in the chicken stock and the milk. Decrease the heat to low and simmer for 10 minutes, stirring often.


Add the chicken meat, thyme, sherry, peas, parsley, salt and pepper.


Place your homemade or instant biscuits on top of the chicken mixture and pop it into the oven.


Bake at 400 F for 25 minutes, or until the biscuits are a golden brown. The brilliance of this method, is that all the food is cooked, so you just have to make sure your biscuit crust is cooked. I prefer the biscuit crust because it is easy and it really sops up all the delicious juicy gravy.




Monday, January 30, 2012

Berber Pizza

This is a delicious recipe I got from David Tanis's A Platter of Figs


Ingredients
1 recipe for pizza dough (makes 2 pizza rounds)
4 medium white or yellow onions, thinly sliced
1 Tablespoon butter
1 teaspoon cumin seeds, toasted and ground
1 teaspoon coriander seeds, toasted and ground
1 teaspoon powdered hot red chile
2 teaspoons harrisa or Paprika
2 teaspoons black pepper
Salt
2 tablespoon chopped parsley
2 tablespoons chopped cilantro


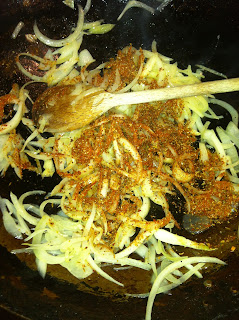
In a wok or heavy skillet, add a swig of oil and some butter. Stir fry the onions for 2 minutes, letting them color a bit but leaving them a little crunchy.

Add the cumin, coriander, red chile, harrisa and black pepper. Season well with salt. Taste, the onions should be rather spicy. Remove the onions to cool, sprinkle with chopped parsley and cilantro.


Preheat the oven to 400 F. Place pizza stone in the oven, dusted with cornmeal flour.

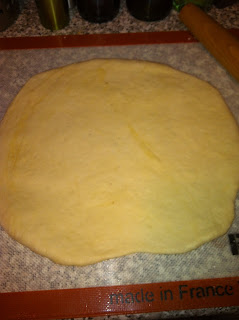
Dive the dough into 2 balls: one for the base of the pizza and one for the top. Roll out into 8 inch rounds on a pastry sheet. Dust a pizza spatula with corn meal. Pick the pizza dough up and lay it upon the rolling pin. Transfer the pizza dough to the pizza spatula.


Spread some olive oil out on the bottom layer of the pizza dough. Spread the onion mixture around the bottom pizza dough, leaving a good inch or so around the outer edge of the pizza bare.


Place the second pizza dough on top of the onion mixture, forming a cover for the pizza. Take the outer edge of the dough and tuck it in towards the center, forming a crust for the pizza. Pinch the edges together with your fingers. With the palm of your hand, press down on the package to flatten it. The pizza should look like a dish. Gently  roll out the filled dough to make a 12 inch circle.


Using the pizza spatula, transfer the pizza to your preheated oven. Place on the pizza stone.

Bake the pizza for 20 minutes at 400 F. After 10 minutes, use the pizza spatula and flip the pizza, to ensure even browning.


Paint the tops of the pizza with a little olive oil and sprinkle with salt. Cut and serve!


Pizza Dough

I love homemade pizza! It is much tastier and cheaper than your local pizza shop and it really doesn't take that long to prepare!

Equipment
There are a few key pieces of equipment you need to really make excellent pizza:

  • Ceramic Pizza stone, La Cloche or brick oven
  • Pizza Peel

The key to really great pizza is a brick oven. Camino, a local restaurant here in Oakland, has a wonderful brick oven and very lovely things comes out of his oven.

If you happen to be one of the millions of Americans who does not have a brick oven in their backyard, don't despair! I don't either! A ceramic pizza stone or a La Cloche for deep dish pizza works equally well. Using la Cloche is excellent for deep dish pizzas, while a ceramic pizza stone is better for thin crust pizzas.

You can purchase a Pizza stone at most grocery stores and kitchen specialty shops:

Bath Bed & Beyond
Williams-Sonoma

I actually got  mine at the local Safeway. It works fantastic. I usually just keep the stone in the oven, this way, it reduces the chance that the pizza stone will break. If I need to use the oven for some other dish, I take the pizza stone out and place it on the counter for an hour or however long I will be using the over for.

The other key piece of equipment is a a pizza peel. It is essentially a giant spatula that you can sneak under the pizza dough to transport it easily. You can get away without having one, but it really helps when you need to transfer your pizza dough with all its lovely fillings from work surface to oven, and from oven to work surface. I got mine at Bath Bed and Beyond and it works great!

Ingredients
Obviously, the fresher your ingredients, the better the pizza. Having fresh active yeast really helps out, it will give your crust the light fluffy consistency. I use commercial yeast that comes in those packages of 3. They work great. Be sure to check the expiration date: the closer it is to the expiration, the less active your yeast will be, and they less fluffy and light your pizza dough will be.

I prefer to use chicken fat or duck fat to pork lard. Either will do, but I find that the duck fat lends a delicious quality to the dough. I will usually collect duck fat from a duck I am cooking and save it in the freezer. I also will collect and strain bacon fat when I am making bacon and use bacon fat. Chicken doesn't have much fat, and I usually collect chicken fat when I am making chicken stock. You can also purchase good duck or chicken fat from specialty stores, like Marin Sun Farms. The good thing about using Marin Sun Farms fat is that it is already rendered for you...you just need to melt it. It's also good to support a local company like Marin Sun Farms-they make good honest cuts of meat!

If you want to make it all vegetarian, substitute 1/4 cup warm water for the fat.

The more you bake with yeast the more spores will come into your kitchen and your oven. I am not really sure about the science behind it, but I find the more often I make pizza, the fluffier my crusts turn out.

Ingredients
Corn meal
1 package active yeast
2 teaspoons sugar
1 cup warm water
1/4 cup of chicken fat, duck fat or pork lard
3 to 4 cups of flour
2 teaspoons salt
Olive oil

Makes 2 pizza rounds

Directions
If you have an electric mixing bowl, now is the time to use it. I got a Kitchen Aid Mixer for Christmas. It works miracles, and it even comes with a dough hook! If you don't have a Kitchen Aid or an electric mixing bowl, you can do it all by hand, and it will come out just as tasty.

Whisk the yeast, sugar and fat or lard together with a whisk until the yeast and sugar dissolve, and the lard is evenly distributed. If you would like to make this vegetarian, just substitute a 1/4 cup of warm water for the lard.


Add the flour and salt and mix, using the dough hook, until the dough crawls up the dough hook. Remove the dough from the bowl. Grease the bowl with olive oil. Replace the dough. Cover with saran wrap or a clean kitchen towel, until the dough doubles in size, about 1 hour.


Roll the dough into 1 or 2 balls. Cover and let the
dough rest for an additional 20 minutes.
The dough is ready to be shaped.                              


When you are rolling out the dough, be sure to rotate the dough as you roll it out. This will help you get a nice round pizza dough.


When you get your dough rolled out, dust some corn meal on a pizza peel and transfer the dough to the pizza peel.

The best way to transfer the dough is to hang it on your rolling pin.

Then add your toppings. Then transfer the pizza peel to the oven and let the pizza slide off onto your hot pizza stone.


Friday, January 27, 2012

Fish in Coconut Milk

This is a South Indian recipe.

When we were growing up, we never had non-veg south Indian food. It wasn't until I was working in India that I got a chance to explore South Indian food outside the confines of my family cooking.

This is a dish from Kerala, where by Dad was born and raised, but I actually first had it at a Kerala restaurant in Chennai. Its absolutely divine!

The fish is fried and then poached in a coconut cream sauce with banana leaves. Delicious!


Ingredients
4 whole small white fish or whole fish, weighing about 12 oz each (1.5 lbs)
1/2 teaspoon ground tumeric
1 teaspoon ground red pepper
1 teaspoon salt
3.5 tablespoon oil
3/4 inch ginger, sliced
6-8 garlic cloves
3-4 green chilies, slit and deseeded
6 green cardamom pods, bruised
2 medium onions slice
2 teaspoons ground coriander
1.5 cups coconut milk
Banana leaf (optional but really nice!)
30 fresh curry leaves
1 cup thick coconut milk (1/2 cup coconut cream will also do)
1 teaspoon black mustard seeds
1 lime, squeezed, for garnish

You can get good fresh fish and banana leaves at most Filipino markets. I got the banana leaves at the Island Pacific Supermarket in Union City. (see my Store I Frequent page for listing)

Take out 2 or 3 of the banana leaves. If they are frozen, it is best to take them now to let them defrost naturally.


Clean the fish. Pat dry with paper towels. Cut slits on both sides of the fish to allow the spices to penetrate.

Combine tumeric, red pepper and salt in a dish or small baking pan. Sprinkle over the fish and gently rub in so the whole fish is covered. Marinate for 5 minutes.


Heat 3 tablespoons of oil in a wok. Fry the fish for  5 minutes on both sides, or until outer skin is crispy and golden brown. Remove with a slotted spoon and drain on a paper towel or banana leaf.


In the same wok, add ginger, garlic, green chilies, cardamoms pods and onion. Stir in the ground coriander and stir fry for a few minutes. Add the coconut milk and allow to heat through. Heat until the coconut milk begins to simmer. Remove from heat and cool slightly for a few minutes. Do not let the coconut milk come to a boil.


Once slightly cool, add the coconut milk and masala mixture to a food processor. Blend until a smooth paste.


In the meantime, take a banana leaf and put it over an open flame on your range. The heat will release natural oils that give the banana leaf its special unique flavor! As you put it under the flame, you will see the leaf change color and turn a bright green. Remove from the flame when all the leaf is that bright green. Be sure not to burn the banana leaf.


Take a wide, thick bottomed skillet and line with banana leaf. Preferably you want a flat bottom pan, not a round bottom pan like a wok.


Place the fish on the banana leaf. Sprinkle with curry leaves.


Pour the coconut sauce all over it. Bring the coconut mixture to a boil uncovered. Reduce the heat to low.

Continue to simmer the coconut milk, uncovered for 5 to 10 minutes until the fish is cooked. Add the coconut cream and heat through. Do not allow the coconut milk to boil.


Take a seperate small frypan and heat 1/2 tablespoon oil. Stir fry the mustard seeds for 1 minute, until they begin to pop. Pour the mustard seeds and the remaining oil over the fish. Serve with freshly squeezed lime or lemon juice on top of the fish. Delicious!


Thursday, January 26, 2012

Green Chili Stew

Now it was the winter of our discontent.
Richard III may be, but he didn't have this delicious green chili stew! So much for him!

I got this from David Tanis's "A Platter of Figs".
The meat I found at a farmer's market in Oakland. The pork was from Prather Ranch (see listing here).
The recipe calls for 5 lbs of boneless pork butt, but we got away with around 2.5 lbs--definitely the cheaper option!

Ingredients
5 lbs boneless pork butt, cut into 2 inch cubes
salt and pepper
2 tablespoons vegetable oil or lard
2 large white onions, finely diced
4-6 garlic cloves, chopped
2 teaspoons cumin seeds, toasted and finely ground
1/2 cup chopped tomatoes
6 large carrots, peeled and chunked
1 cup roasted  green chilies
2 tablespoon all purpose flour
8 cups chicken stock or water.
3 lbs russet potatoes, peeled and cut into large rough dice
chopped cilantro


Season the pork with salt and pepper generously.

Take a large stock pot and add oil or lard. Add the meat in several batches, without crowding, and brown them lightly. This will seal in the moisture and make the meat soft and juicy! Transfer to a platter after browning.

Add the onions and brown. Then add garlic, cumin tomatoes, carrots and green chilies. Sprinkle with flour and stir. Add salt and stir. Then return the meat to the pot.  and stir well. Cover with water or broth. Bring to a boil.


Reduce the heat to low, cover the pot and simmer gently for 1 hour.

Taste the broth, add more salt and green chile to taste. The broth should be well seasoned and fairly spicy.

Add the potatoes and continue to cook for 30 minutes or until the potatoes are soft and the meat is quite tender and soft.

Remove from heat and let cool for 1 hour or more. Reheat to eat right away or store in the refrigerator.


To serve, sprinkle with some cilantro and hot tortillas.


Alternatively, I made this stew a second way: This time, I coated the pork as before with flour, but deep fried it, to give it a crispy skin and lock in the juices and moisture.


I then used a crockpot and slowly cooked the concoction for several hours.It was delicious!


Monday, January 9, 2012

Thai Monk Fish

Ok...I have been negligent! A combination of ending up the year, going to Hawaii and planning wedding stuff has led me to ignore Shokubi!

Yet, I continue to cook (hey, you gotta eat).

This is another Jamie Oliver recipe. I quite like his styles, boss! This was for a Thai dish-Monkfish, steamed in banana leaf with coconut milk and all sorts of lovely spices! You can find the recipe here

I followed the recipe to a T on this one, and it was delicious!

I found a really neat trick was to take the banana leaves and heat them up an open flame to release their natural oils. Really gives it such a better flavor!