Table of Contents

Friday, August 24, 2012

Jumbalaya in the Slow Cooker

This is part of my continuing series on Jumbalaya.

This was actually the first time I tried my hand at Jumbalaya. It turned out okay, but it wasn't as tasty as my Jumbalaya in a cast iron pot, which had a delicious Gumbo base.

Ingredients
1 lbs chicken breasts, cut into 1 inch cubes
1/2 lbs of adouille sausage, sliced
1 (28 oz) can tomatoes, diced
1 medium onion, chopped
1 green pepper, diced and seeded
1 stalk celery, chopped
2 cup rich dark chicken stock
2 teaspoons dried oregano
2 teaspoon Cajun Spice Mix
1 teaspoon hot sauce
2 bay leaves
1/2 teaspoon dried thyme
2 cups rice, uncooked


In your trusty slow cooker, combine the chicken, sausage, tomato, onion, green pepper, celery and chicken broth. Stir in the oregano, Cajun spice mix, hot sauce, bay leaves, thyme and rice.


Slow cook on LOW for 7 hours, or on HIGH for 3 hours.


Thursday, August 23, 2012

Jambalaya in the Pressure Cooker

This is my second post on Jambalaya. I made this version of Jambalaya in my new pressure cooker. The great thing about this Jambalaya was that it was very quick and easy, the pressure cooker cooked the rice down in a matter of minutes.

I used my trusty Fagor Pressure Cooker which was quite nice. Cooking with pressure cookers in convenient, but there is an element of risk involved. Please review my post Pressure Cooker Instructions and Handling and the specific instructions for your pressure cooker before cooking this recipe! I got this recipe from the Fagor Pressure Cooker cookbook.

I found that some of the rice stuck to the bottom of the pressure cooker, burning the rice. I scraped off most of it, and it added a burned flavor to the jambalaya which was actually quite nice. That being said, despite all its convenience, I found my version of Jambalaya using a cast iron pot to be better. There is no school like the old school! I think having the roux makes a big difference, but making a roux takes time and patience. The advantage of the pressure cooker is speed!

Perhaps a way to spice this dish up would be to use some Lamb Barbacoa sauce. I didn't do that for this dish, but I think it might have helped it along, in retrospect. I had a bunch of it frozen in convenient cubes. I would recommend about 1/4 of a cup, as it is super spicy.   

I think another useful addition would be to stir fry the onions in a little chicken fat. Perhaps the spicy chicken fat from Pan Fried Southern Chicken. Again, I didn't do this for this recipe, but it retrospect it might have been a good idea.

Ingredients
Olive Oil
Spicy Sausage
1 medium onion, chopped
3 garlic cloves, minced
2 tomatoes (skinned, seeded and chopped preferred, but just chuck them in if you dont want to skin and deseed)
4 or 5 pieces of Okra, sliced
1/4 teaspoon paprika
1/4 teaspoon Harissa
4 cups rich dark chicken stock
1/4 teaspoon saffron
2 cups of rice (short or long grain)


Directions
Heat the olive oil in the pressure cooker. Add the sausage and stir fry until cooked. Hopefully some of the fat will come out of the sausage, which would be a good thing.  Add a little more of the chicken fat and stir fry the onions. When the onions are a little browned, add the garlic.

Add the tomatoes and stir fry for a few minutes. The tomatoes should start sweating out their juices. Add the paprika, chicken stock and saffron and let simmer for a few minutes to let the flavor develop.


Add the okra.  Add the rice and give it a good stir to incorporate and mix. Bring the liquid to a boil.


Close the lid of the pressure cooker and lock. Bring to pressure and cook for the suggested time:
Position 1  6 minutes
Position 2  3 minutes


Remove from heat. Let the pressure release naturally. Do not quickly release the pressure! Let sit, closed for another 4 minutes to let the rice soak up the flavor.

Once all the pressure has been released naturally, remove the lid and serve.


Jumbalaya in a Cast Iron Pot

I had authentic Jumbalaya a few months back when I was on a business trip to New Orleans. It was fantastic! Along the way, I picked up some Gumbo spice from a spice shop in New Orleans, which proved wonderful in this dish!

So far, I have made this dish three separate ways: First, in a slow cooker, next in a pressure cooker and lastly in a cast iron pot. I varied the recipes a little depending on the method of cooking. I think the winner is the old fashioned way with a cast iron pot. I will post the cast iron pot method today, and the other two methods in my next two posts! This way, Shokubi readers, you can try all three and see what works best for you!

The basis for this Jumbalaya were three key ingredients: my leftover Chicken Gumbo from last night, leftover sauce from Lamb Barbacoa (frozen in convenient cubes), rich dark chicken stock and leftover rice. That being said, this was the easiest of the three Jumbalayas to make, as I had already labored over my Chicken Gumbo and it had a good day to absorb and deepen its unique flavor.


Ingredients
Leftover Chicken Gumbo
Leftover sauce from Lamb Barbacoa (frozen in convenient cubes, about 1/4 of a cup) 
Rich dark chicken stock or Lamb stock
Rice, either leftover or freshly cooked (I used leftover rice)
Sausage (if you dont have any left from the Chicken Gumbo)
Okra, sliced (optional)

Directions
Thaw or melt the barbacoa sauce in a small saucepan. Only use about 1/4 of a cup, because it is really really spicy. Once it melts and is hot, slowly pour it over the chicken gumbo in another pot. Stir. The gumbo will be really sticky because it has been sitting in the refrigerator for a day and all the starch of the roux is hard. Slowly stir the barbacoa sauce in.


Start to add the chicken or lamb stock to the saucepan. Again, slowly stir in the stock until it incorporates.

Add the rice to the pot and continue to stir. The rice will absorb some of the liquid from the pot. Add more chicken stock as needed. Jumbalaya is not soupy like Gumbo, so the liquid should absorb into the rice.


Serve when the rice has heated up! 


Tuesday, August 21, 2012

Chicken Gumbo

I went to New Orleans for the first time a few months back. It was such a fantastic place! Decadent, decadent food! Delicious and quite rich! One of the best things I had here was Gumbo. Gumbo is essentially a spicy stew of tomatoes, celery, bell peppers and onions, mixed with Cajun spices and meat of some kind.  Spicy and savory, its absolutely delicious. Its great when you have a whole bunch of leftover veggies around. I had picked up a Gumbo spice mix in New Orleans, which I used in this recipe.


This was my second attempt at making a roux, the first was when I made Homemade Japanese curry.
A roux is basically a paste of flour and butter. Or flour and oil. Or flour and animal fat. My conclusion: making a roux is rather difficult, requires constant attention, but well worth the effort. You really have to stir the roux constantly and keep an eye on it, otherwise the flour will burn and the whole thing is ruined! I found having a good hand held wire whisk is indispensable! The key is to keep stirring until the flour is completely incorporated into the roux.

I adapted this recipe from a blog called Annie's Eats. I say adapted because, I screwed up the recipe! It really pays to pay attention and not cut corners...lesson learned the hard way. First, I decided to cut the onions in a food processor, because onions always make me cry and I broke my trusty pair of onion goggles. The result was that the onions were very finely cut, almost a mush! Its would have been better to just chop the onions by hand.

Second, quite by accident, I changed the process of making this. Her original recipe says to cook the bacon with a little oil. Once the bacon is done, and the fat renders out, you are supposed to add the chicken and cook it in the bacon fat (yum!). Then add the sausage. After removing all of the meat from the pot, you then make a roux from the remaining chicken, bacon and sausage fat. Add a little chicken stock to the roux. Then you stir celery, green pepper, onion, garlic into the roux, add stock and add your meat back in and slow cook for 1.5 hours. Done. Simple. Delicious. Right?

That would seem like the logical way of doing things. Things started out okay, but then went quickly wrong!

I started with cooking the bacon, which came out perfect. Removed the bacon, and had some nice bacon fat. Unfortunately, I didn't have enough bacon fat, so I added some chicken fat.  Adding the chicken fat was actually quite nice, because the fat had cayenne pepper, harissa and other nice spices in it. So I was feeling pretty happy with myself about the chicken fat! I was really worried about making the roux. I just went ahead and added my flour to make the roux from the chicken and bacon fat. The roux was coming out beautifully, which I was quite proud of. Look at that color, look at that consistency!

When things go wrong
And that is when the mistakes started piling up. It was then I realized I made my first mistake: In my haste, I forgot all about cooking the chicken in the fat!  I realized my mistake too late, but I figured I could still salvage the situation. I would just cook the chicken in the chicken broth with the spices. The chicken wouldn't have that delicious crispiness that frying brings, but in the end everything would be okay, right?

I guess that would have been okay, if I stopped there. But, no, I went on! For some reason, that I cannot even think of, I added my vegetables to the beautiful roux, which turned out to be a horrible mistake! Things went bad fast! The roux broke down, and got all mushy, pasty and nasty. My beautiful roux turned into some sort of nightmare bete noire.  The liquid started evaporating, leaving me with a roux that was going to start burning any minute and vegetables that were not even slightly cooked! Yuk! My beautiful roux went from the above picture to this in a matter of minutes.


I added chicken stock immediately and started stirring it with a wire whip immediately! The vegetables started getting stuck in the wire whip, which was bad.


It took a good five minutes of whipping, but the roux finally started coming together in a good way.


Once the roux had a good consistency, I went back to the recipe. I added the chicken pieces and slow cooked them in the liquid broth. The sausages were already cooked, so I just added them in at the end. Added the spices, the tomatoes and the okra and let it cook for 30 minutes. It turned out great in the end! I added the bacon as a topping while I was serving it with rice.

What I have learned from this experience:
1. I will always stir my roux. I will always stir my roux. I will always stir my roux.
2. Cook your bacon first. Remove and cook your sausages. Remove the sausages, add some chicken fat and then cook your chicken. Remove the cooked chicken. The combined oil and fat from the bacon, sausages and chicken should be enough fat to make the roux. If not, add some additional chicken fat. The fat from my fried chicken works well, and gives it a great orange color and pepper flavor!


Ingredients
6 oz bacon, cut
2 lbs chicken (preferably legs or thighs, bone-in or breasts in a pinch. I used breasts, skin on)
Salt
1 lbs spicy andouille sausage (Merguez sausage or spicy Italian sausage crumbled would work too)
1/2 cup chicken fat (I used the leftover chicken fat from my pan fried southern chicken, which lent a delicious amber color to my dish. Peanut oil or regular vegetable oil would work fine as well)
1 cup flour
2 green peppers, seeded and diced
4 stalks celery, diced
1 large onion, diced
4 garlic cloves, minced
2 tablespoons tomato paste
4 cups rich dark chicken stock
1/2-1 lbs okra, sliced
Cajun Spice Mix

Garnish:
3 green onions, chopped
Fresh parsley, chopped


Directions (The Right way of doing it!)

Cook the meat 
In a large stockpot (I used my trusty Le Creuset Oval French Oven), add a little bit of oil and cook the bacon over medium-high heat until the bacon is cooked and crispy. Remove the bacon with a slotted spoon and drain on paper towels.

At this point, add the chicken to the pot. Cook skin side down for a few minutes. Sprinkle some salt on the side that is facing up. Cook for 4-5 minutes, then flip. If there is not enough oil when you are cooking the chicken, add some chicken fat. Remove the chicken with a slotted spoon when it is done.


Making the Roux
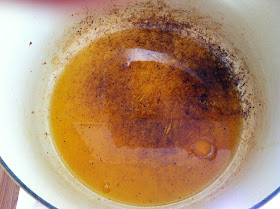

You should have about 3/4 of a cup of oil and fat in the pan (add more oil or chicken fat if you don't have enough). Heat the oil over medium heat.


As it gets hot, stir in the flour. Whisk the flour constantly with a wire whisk. This should take several minutes. Reduce the heat to medium-low, and continue to stir.


While the roux is cooking, bring the chicken stock to boil in a separate pot. When the roux has reached the color you want it, add the garlic and tomato paste to it.

Using a ladle, gradually add the hot chicken stock to the roux. Continue to ladle in stock, and stirring constantly with a whisk. It helps to have a second pair of hands: someone can ladle and someone can stir (Big thanks to my beautiful wife Robyn!). The roux should thin out and be more soup like.


Add the tomato paste to the roux and whisk. Stir in half of the cajun spice mix. Taste. Add more of the cajun spice mix if needed.

Stir fry your vegetables
In a separate fry pan, stir fry the diced green pepper, celery and onion in more chicken fat. Stirfry for about 5 minutes. Stir in the garlic and continue to cook for about 1 minute more, until the garlic turns golden brown. Transfer all of it (including any remaining chicken fat) to the roux.

Add the chopped okra to the roux soup. Cook for a few minutes.

Add the cooked chicken to the roux soup. Add the sausage to the roux soup.

Bring the whole soup to a boil then reduce heat to low. Cover and cook for five minutes. About once a minute, give it a quick stir to make sure nothing is sticking to the bottom and burning.

Sprinkle the bacon on top of the soup. Garnish with green onion and fresh parsley.


Cajun Spice Mix

This is a great spice mix which you can use for fried chicken, grilling or Gumbo! I adopted this recipe from a blog called Annie's Eats

Ingredients
1 teaspoon black pepper, crushed
1 teaspoon cayanne pepper
1 teaspoon Gumbo Pale or celery seed
2 tablespoons Sweet Paprika
1 tablespoon garlic powder
1 tablespoon dried thyme
1 tablespoon dried oregano

Mix all the ingredients in a mortar. Transfer to a spice shaker or airtight container.

Monday, August 20, 2012

Turkey Larb


Larb is a spicy and sour ground meat salad from Lao and parts of northern Thailand. I had been craving larb for a while, and decided to make it myself. I scoured the internet and cookbooks for recipes, but eventually settled on larb recipe from one of the blog's I follow, Wandering Chopsticks. This recipe is legit-and very very tasty.


I think what makes the dish is the addition of Bot Thinh/Kao Kua (Vietnamese/Thai Ground Roasted Rice Powder). When I was making this dish, I was debating if I wanted to take the effort to make the ground roasted rice powder. I had mochiko powder and thought it would be fairly similar. I am glad I took the extra effort to make the grounded rice powder. It did not take all that much longer, and it really lends a delicious texture to the meat, while imparting a subtle flavor.

Doctoring up the Vietnamese Fish Dipping sauce is also relatively easy and really adds a nice flavor to this dish!

Using a lean meat like turkey was good in this recipe because it created less fat that I had to drain out!

Ingredients
2 tablespoons of Bot Thinh/Kao Kua (Vietnamese/Thai Ground Roasted Rice Powder)
Vietnamese Fish Dipping Sauce
1/2 lbs of ground meat of your choice (I used turkey, because it is lean and less fatty)
a few springs of mint leaves
a few chives (chopped) or scallions (thinly sliced)
a few kaffier lime leaves, thinly sliced (optional)
Thick Homemade noodles, or store bought rice noodles (be sure to get the thick kind)

Directions
Saute the ground meat in a wok with a little oil until fully cooked. Move the meat to the sides and press down to remove most of the oil. Remove the meat and place in a separate bowl.

Add a 1/4 cup of the Vietnamese fish dipping sauce and mix it with the meat. Taste and add more if necessary.

Add 1 tablespoon of the roasted rice powder, mint and chives/scallions.

Continue to add a little bit of the dipping sauce until you get it to the flavor you want.

Serve over thick homemade noodles or store bought rice noodles. Its so delicious!


Vietnamese Fish Dipping Sauce

This is a great way to doctor up fish sauce. You can use it for larb or a dipping sauce for spring rolls.
This recipe is from a blog I follow, Wondering Chopsticks. I store mine in a 24 oz glass jar.

Ingredients
1/2 cup water
1/2 cup fish sauce
1/2 cup vinegar
1/2 cup sugar
Crushed chili pepper (optional)

Directions
Heat the water. You need to get the water hot to dissolve the sugar.

Stir in the fish sauce, vinegar and sugar. Stir until the sugar is dissolved. Add the crushed chili pepper.

The taste should be sweet and mild and the pungency of the fish sauce is muted.


Bot Thinh/Kao Kua (Vietnamese/Thai Ground Roasted Rice Powder)

I got this recipe from a blog I follow, Wandering Chopsticks. I have not had the chance to use it for anything but Vietnamese Larb. Its delicious!

Ingredients
1/2 cup uncooked jasmine rice or glutinous rice


Directions
In a cast iron skillet, turn the heat to medium-low. Add the rice and slowly saute the grains.


Continue to slowly saute the rice grains until they are light brown. Watch the rice carefully and don't let it burn. This should take about 10-15 minutes.


Remove the pan from heat, transfer the rice to a bowl and allow the rice to cool completely. You will need to grind the rice into a fine powder, so you need the rice completely cool. If it is even a little hot, it will stick to the blades of your spice grinder. Also, warm rice can dull or damage your blade when you are blending it.

Once the rice is completely cool, transfer to a spice grinder (or mortar and pestle) and blend until it is a fine powder.

Store in a glass jar. It will last up to a year.


Friday, August 17, 2012

Nanban Sauce

This is a delicious sauce of ginger, leeks and red peppers. It works great with Tori Karaage (Japanese Fried Chicken), agedofu (fried Tofu) or mifun (Japanese rice noodles). 

The liquid part of this sauce I adopted from a food blog called Just Hungry. The rest is my crazy mind doing what it does...

Ingredients
2 tablespoons Raiyu (Chinese Hot Chili Oil)
1 leek, minced (white part only)
3 tablespoon ginger (peeled and minced)
3 red peppers (minced, seeds removed if you want it less spicy)
1 tablespoon Garlic, about 7 or 8 cloves (minced)
1 cup rich dark chicken stock
1/2 cup rice vinegar
1/2 cup mirin
1/4 cup dark soy sauce
1/4 cup water
2 tablespoons sugar
a pinch of salt


Directions
To mince the leak, see my post on tofu stirfry

Add a tablespoon of the raiyu to a wok or cast iron pot, enough to give it a thin coating. Heat until you can feel the heat emanating from it with your hand. 

Stir fry the leek and ginger together for a few minutes, until the leeks and ginger start to release their aroma.   
Reduce the heat slightly, add the garlic, and stir fry for a few more seconds. Do not let the garlic burn, so reduce the temperature as needed. You can even remove the wok from you heat source, the oil should be hot enough to continue to gently cook the garlic. 
8 cubes of chicken stock are added

Once the garlic is a nice golden brown, add the chicken stock, rice vinegar, mirin, dark soy sauce and water. 

Continue to cook on low heat for several minutes, until the flavor begin to blend together. 

Transfer to a bowl. Add 1 tablespoon of raiyu and stir to incorporate. 

Use immediately or let cool to room temperature before storing in the refrigerator. 

Tori Karaage with Nanban Sauce (Japanese Fried Chicken with a spicy leek sauce)

This is a delicious recipe for Japanese fried chicken with a spicy leek and red pepper sauce.

The chicken is marinated in a combination of soy sauce, sake and sugar then battered in mochiko (Japanese rice powder), flour and salt. Its deep fried and served with nanban sauce (a spicy dipping sauce of ginger, leeks and red peppers).

Nanban sauce is a Chinese based Japanese dipping sauce. Nanban (南蛮)means southern barbarians, the character nan (南) meaning south (and referencing the Chinese communities in Nagasaki during the Tokugawa Shogunate) and ban (蛮) meaning barbarian (as in yabanjin 野蛮人). The leeks, ginger, garlic and raiyu make it very Chinese!


When I was working in Japan, this was one of my favorite dishes. Japanese fried chicken is delicious and very different from American/Pan Fried Southern Chicken. I would always get this when I would go to an Izakaya (Japanese style pub) or have an Enkai (company drinking party), so much so I became known as "the gaijin guy who likes chicken".

I adopted this recipe from Just Hungry, a blog about a Japanese lady living and working abroad.

Ingredients
Chicken thigh or breast, 1 lbs
2 tablespoons Nanban sauce (Chinese spicy leek sauce)
2 tablespoons Sake (Japanese Rice wine), preferably junmai
Mochiko flour, 1/2 cup
Cornstarch, 1 tablespoon
Salt, 1/2 teaspoon
Corn oil for frying

Directions
Cut chicken into bite sized pieces. I cut mine pretty small. In retrospect, it might have been easier to make the pieces a little bit bigger.

Strain some of the nanban sauce to remove the leeks, ginger and any vegetables. I usually strain it with a handheld strainer. You won't need too much, just about 2 tablespoons of the sauce.

Marinate the chicken in the Nanban sauce and sake for at least an hour, preferably overnight, in the refrigerator.


Remove the chicken from the refrigerator. As the chicken starts to come to room temperature, heat corn oil in a wok. Using a thermometer, bring the oil to around 340-360 F. Monitor this closely, as you don't want the oil to get hotter than this, it will ruin the flavor of the chicken.

Make a batter by combining the Mochiko flour, cornstarch and salt. Place in a plastic rectangular box with a lid. With a pair of chopsticks remove a piece of the chicken. Shake off any excess soy sauce and pop it into the rectangular box with the mochiko flour. Continue to add pieces of chicken from the marinade to the mochiko flour box. When you have about 10 pieces, close the lid and give it a good shake to make sure all the chicken is coated.


Check the temperature of the oil, the addition of the chicken might have lowered the temperature of the oil. Adjust accordingly to reach the target temperature of 340-360 F for the oil.


With the same pair of chopsticks, pick up a piece of the chicken and shake off any extra mochiko powder. Gently place it inside the wok with the oil. I usually will put only a few pieces in at a time (maximum of around 5 pieces), you don't want to crowd the chicken. When they turn golden brown, remove with a slotted brass  spoon and place on a paper towel to absorb any excess oil.


With a meat thermometer, test the internal temperature of the chicken. A cooked piece should have an internal temperature of around 192F-197 F. If it is around 165 F, it will probably be a little pink and uncooked in the center. You can also cut into one of the pieces to check if the meat is cooked. It should be white all around, with no pink whatsoever.


The finished chicken should look something like this: There should be some texture on the meat that the mochiko provides. Serve with rice and the nanban sauce.


Thursday, August 16, 2012

Tomato and Herb Chicken in a Pressure Cooker

This was the first recipe I made with the pressure cooker. It worked out fantastic! The sauce has a very rich and deep flavor I used the Fagor Pressure Cooker and it was great! Before you start this recipe, thoroughly familiarize yourself with how your particular pressure cooker works. Be sure to read all the instructions for using the pressure cooker. Reference my post on Pressure Cookers Instructions and Handling.


Ingredients
3 lbs chicken, cut into pieces (or chicken wings and/or drumsticks)
Butter
1 white or yellow onion, cut in half then quartered
3 medium tomatoes, sliced
1 1/4 cup Rich Dark Chicken Stock
1/4 cup parsley, chopped
1 tablespoon fresh rosemary
1 tablespoon fresh sage, chopped
1 tablespoon lemon thyme or regular thyme
Sherry, 1/4 cup
Salt and pepper to taste

Directions
Heat butter in the pressure cooker and brown the chicken on all sides.


Remove the chicken and saute the onions until golden brown.


Add tomatoes, parsley, chicken stock, herbs salt and pepper. Continue to stir fry until the chicken stock begins to boil.


Add the chicken back to the pressure cooker.
Secure the lid and lock it into place.

Put the gas burner to high. Maximum pressure will be reached and a pressure button will pop up. Once the button pops up, reduce the burner slightly and begin the countdown for the suggested  cooking time. Release pressure, remove the lid and serve with farro.

Position 1: 28 minutes
Position 2: 15 minutes


Pressure Cookers Instructions and Handling

My aunt and uncle recently got us a Fagor Duo 5-Pc. Stainless Steel Pressure Cooker Set and I started making some meals in it!  Its absolutely fantastic. This post is just about how to use, care and store your pressure cooker. You can find recipes using a pressure cooker elsewhere on my blog.

Pressure cookers look like regular pots, except for a valve to release steam (and thus reduce pressure) and a seal, which creates an air-tight seal.  The valve can be set to different levels, to decrease the amount of steam (and thus adjust the pressure).

Advantages of Pressure Cookers
The advantage of pressure cookers is that because of their high pressure, they require less heat and less time to cook food. Case in point would be this meal: Ordinarily, browning a chicken and then slow braising it to perfection would take at least 2 hours with a traditional braser on the stove, or several hours in a slow cooker. Using the pressure cooker, this meal took me just under 30 minutes! This is great because it saves time and energy (gas). Even though they take less time and gas to cook food, I found that there is so substantial reduction in taste or quality of the final meal.

Second, you only use the one pressure cooker pot. Everything can be made in this pot and, thus, cleanup is much easier!

How Pressure Cookers Work
Pressure cookers are designed to create an airtight seal when they are properly locked into place. The seal prevents any steam inside the pressure cooker from escaping.  As the liquid inside the pressure cooker heats up, it eventually reaches boiling point (212 F, 100 C). Steam is created, but as it has no way of escaping the pot, the pressure begins to rise. This causes the food (meat and/or vegetables) to cook faster than conventional means.

Safety Concerns and Precautions
I have never used a pressure cooker and I was, to say the least, a bit intimidated! There are some safety concerns, but as long as you follow the directions you will be fine. You are dealing with gas under pressure which can be extremely dangerous. The pressure cooker has the added risk that it is steam which can scald. Exercise extreme care and caution when you are cooking with a pressure cooker!

First, you have to make sure  you have the right amount of liquid for the particular recipe. Too little, and your food won't cook. Too much  and...well, bad things could happen. The pressure could build up, ruin your meal, but could also explode if the value is not working properly (see point #2). The pressure cooker needs space for steam to be created and room for the pressure to build. Its paramount to never fill your pressure cooker more than 2/3 full.

Make sure the pressure cooker is washed well after the last use. Make sure that there is no food or residue of any kind inside the pot, and most importantly on the lid.

Second, make sure the inner part of the lid rim & the outer rim on the part are clean. Make sure that the rubber seal is not cracked and flexible (not dried out and crusty). Finally, make sure that the valves on the pressure cooker are free from debris or crusted on food. If the seals are cracked or torn, don't use the pressure cooker until they are replaced.

General Operations
To build pressure, and thus cook food, the liquid inside the pot must be brought to a boil with the lid locked in place. In terms of operations, that means stirfrying everything before hand, adding the liquid element of the meal, boiling it and then locking the pressure cooker lid in place. Once the lid is securely locked into place, set the pressure you need to cook at. Raise the burner to high heat. As the pressure builds, the pressure valve will rise to indicate that the maximum pressure has been reached.
Once maximum pressure is reached, lower the burner slightly. If you lower the temperature too much, however, the internal temperature of the pressure cooker will drop and steam and pressure will decrease.

Releasing Pressure
Once the food is cooked, under pressure for the desired time, remove from heat. At this point, you need to reduce the pressure inside the pressure cooker before you remove the lid. This is very important. If you don't allow this to happen, and try to take the lid off under pressure, the pressure cooker could explode (if you can even take the lid off). You can let the pressure reduce naturally (it will slowly escape the valve) or you can speed up the process by pressing the release valve. If you press the release valve, be very careful, and scalding hot steam will be released.

Recipes for pressure cookers will give instructions for how much pressure is needed in various terms. For the Fagor pressure cooker, the internal cooker temperatures and pressures are as follows:

Pressure           Setting                        Temperature               Pressure in PSI
LOW                1                                 215 F                               8
HIGH               2                                 250 F                               15

Opening and Removing the Lid
Most pressure cookers will have a safety feature build in that will allow the cooker to be opened only after all the build up pressure is released. The food inside will be extremely hot. Use caution in removing the lid, as some steam will still be left in the pot. Never hold your face directly over the cooker as you remove the lid.

Care and Maintenance
Wash the inside and outside of the pot and lid with mild dishwashing soap and rinse well. Never immerse the lid in water! This will damage the safety valve. Never wash any part of the pressure cooker in the dishwasher-pot, lid, or gasket. Always remove the gasket and wash separately. Allow the gasket to dry on its own before replacing it inside the lid.

When storing the pressure cooker, never lock the lid in place, since you could damage the gasket due to moisture. Always store your pressure cooker with the lid upside down on top of the pot.


Monday, August 13, 2012

Homemade Whole Wheat Pasta

I got the KitchenAid Stand-Mixer Pasta Attachment Set which I have been dying to use! This thing is fantastic! It really makes making pasta fun and easy.

The pasta attachment from KitchenAid comes with a pasta roller that will roll your pasta dough out for you, and various cutters, which will cut your pasta into various shapes and lengths.
I was really surprised how easy it was to use!

I have never been a big fan of wheat pasta, but this is actually really quite tasty! My soba sensei in Nagano would be proud--or maybe ashamed?


Ingredients
4 large eggs
2 teaspoons water
3.5 cups whole wheat flour
1/2 teaspoon salt

Special Equipment
Kitchen Aid Mixer and Pasta Attachments
Large plastic or wooden box
Spare clean newspapers
Silicone Pastry Mat for rolling dough


Directions
Place the eggs, whole wheat flour and salt in the mixer bowl. Attach the bowl and the flat beater. 

Turn to speed 2 and mix for 30 seconds. 


Exchange the flat beater for the dough hook. Turn to speed 2 and knead for 2 minutes.


Remove the dough from the bowl and hand knead for 2 minutes. 


Roll the dough into a log and divide into eight equal pieces, about 3/8" (1 cm) thick. Take one of the pieces and roll it flat. 


On the Kitchen aid, unscrew the front screw and attach the pasta sheet roller. The the Pasta Sheet roller to level 1 by pulling the knob straight out and turning to setting 1. Release the knob, making certain that the pin on the roller housing engages the opening on the back of the knob. The knob should fit flush to the roller housing. 

Turn the mixer to speed 2 or 4. Take one of the pieces of dough and flatten it with your hand. Gently feed the flattened dough into the rollers. Fold the dough in half and roll again. Repeat this folding and feeding process several times, until the dough is smooth and pliable and covers the width of the roller. Lightly dust pasta with flour while rolling and cutting to aid in drying and separation. Knead and fold each piece of dough in the same manner. 

Move the adjustment knob to setting 2. Feed the dough through the rollers and fold in half as before to further flatten. 

Move the adjustment knob to setting 3. Feed the dough through the rollers and fold in half as before to further flatten. 
Continue to increase the roller setting and roll the dough through the pasta roller until you get your dough as thick as you want it. 


The sheet of dough can get quite long! If you can't handle it, just cut the dough in half. 

Replace the dough roller with the pasta cutter attachment. Feed the flattened dough through the cutter. 


I had a long rectangle plastic box that I used to place the completed dough in. After you lay down the first layer of noodles, sprinkle lightly with flour and place a piece of old newspaper on top of them. Sprinkle some flour on top of the newspaper and lay your next batch of noodles. 

Its best to lay the noodles flat. I put them into little lumps and they wouldn't separate easily!


Boil the noodles till desired doneness and serve with homemade tomato sauce

Delicious and nutritious!