Thursday, June 7, 2012

Cherry Rhubarb Pie

We participate in a CSA called Farm Fresh to You, located in Capay, CA. These guys are great! They deliver us fresh fruit and vegetables to us once every two weeks. Supporting local farmers is so important, and the fruit and vegetables are far tastier and fresher than anything you can get at a supermarket. One of the added benefits is that you don't get much choice with what you get with every shipment. This forces you to try new foods and new recipes. We got rhubarbs in our weekly box and I was inspired to make some sort of rhubarb pie. Fortunately, we got a bunch of fresh cherries at the Lakeshore farmer's market, so it seemed the perfect union to make Cherry Rhubarb pie.

This was my first time making Cherry Rhubarb pie, and my first time cooking with Rhubarb (I know, I am such a newbie!). I have had a slice or two of Rhubarb pie at the Petaluma Pie company, in Petaluma, CA, which was quite tasty and the inspiration for this dish.

I scoured the internet and found an excellent recipe for Cherry Rhubarb pie on a food blog called Not Eating Out in New York . The only difference is that I used my own recipe for pie dough, and I replaced cornstarch with tapioca flour, which was quite a nice choice!


This was also my first time making a lattice crust-the pretty criss-cross pattern on the pie. I thought it came out pretty good! What do you think? Based on the size of my pie pan, after making my lattice crust, I had left over dough. I used that dough to make Strawberry tarts with rose syrup and cardamon!


Ingredients
Double recipe for Tart & Pie Dough
1 lbs rhubarbs (about 1 1/4 cup chopped), sliced into 2 inch pieces (about 1 Rhubarb stalk)
1 cup of cherries, pitted and sliced (plus any extra juice from the cherries)
3/4 cup sugar
1/2 teaspoon salt
2 tablespoons tapioca flour (or substitute cornstarch)

Preheat oven to 400 F.

Roll out one of the pie dough discs and place into a greased pie pan. With a pairing knife remove any excess dough that is having over the edge of the pie pan. You want the crust flush with the rim of the pan. Add any extra dough to the second dough disc.

In a large bowl, mix the rhubarbs, cherries, sugar, salt and tapioca flour.


With a pasty brush, brush some melted butter all over the crust, on the bottom and sides.

Pour the mixture on top of the rolled out pie dough in the pie pan and spread it out evenly. Lower the temperature of the oven to 375 F.


For this pie, there will be a lot of liquid from the cherries and rhubarb, which will get really hot and want to ooze out of your pie. You could theoretically just pop another rolled out pie crust on top of the pie, but it wouldn't be as tasty. There will be a lot of liquid and moisture oozing from the rhubarb and cherries. By making a lattice weave crust, you will let that extra moisture exit the pie without oozing. A lattice weave is that criss cross dough shape that you see on pies at farmers markets, in magazines etc. It looks complicated, but it is actually rather simple and it looks really beautiful!

Making the Lattice Crust
Roll out the second pie dough disc.

Cut the dough into wide strips. Because your pie dough is in a rough circle, you will have some pieces which are longer than others. This is a good thing!


Place your longest strip down the center of the pie. Place two more strips to both the right and the left of that center piece. The strips closer to the center should be longer than the strips to the outer end.


Starting with the strips on the outer edge, gently fold the strip over itself in half. Repeat with every other strip, so you are alternating between a long strip and a folded over strip like this:


Next, take a long strip and place it down the center of the pie, ontop of the strips you just laid down.


Take the two or three strips that are folded and lay them down on top of the center strip.


Now, this time you will want to place a vertical strip down to the right of the center strip. Repeat the same process, but this time fold every other horizontal strip over to the left.


Now place a vertical strip to the right of the center vertical strip and unfold the strips that you had just folded over, this this:


Continue repeating the same process, but this time place the vertical strip to the left of the center strip. If you have more room, continue the process, placing one strip to the far right and far left of the pie. You should have something that looks like this. Take your thumb and press together the ends of the strips into the pie crust.  Gently brush the lattice crust with some melted butter.


Place the pie on a baking sheet with parchment paper. This is really key because you might have some of the cherry and rhubarb juices ooze out of the lattice crust.

Place the baking sheet with the pie on the middle rack and bake for 1 hour and 15 minutes at 375.
Remove from oven and place on a cooling rack for at least an hour before eating.


Wednesday, June 6, 2012

Israeli Couscous with Merguez Sausages

I guess I am on a North African kick this week...
This is a simple yet delicious dish of Couscous and Merguez Sausages. The sausages already contain harissa, which lend a delicious spiciness to this dish. Israeli Couscous gives it a delicious texture. Moroccan preserved lemons are a fantastic side for this dish! 


Ingredients
Around 1 cup (8 cubes) Lamb stock or Rich Dark Chicken Stock
Israeli Couscous
Olive oil 
Merguez Sausages (around 4), cut
1 tablespoon butter
2 medium onions (white or yellow), thinly sliced
1 teaspoon harissa
1 teaspoon hot red chili pepper or tagine spice
1teaspoon cumin seeds, toasted and ground
1 teaspoon coriander seeds, toasted and ground
2 teaspoons black pepper
2 tablespoons chopped parsley
2 tablespoons chopped cilantro


Melt lamb or chicken stock if frozen. 

Heat a braising pan and add couscous. Continue to stir fry constantly on low until the couscous begins to tan. You don't want to burn the couscous, so be sure to stir often. 

When the couscous begins to tan, quickly add the lamb or chicken stock. Continue to stir, making sure the couscous does not stick to the bottom of the pan. You want just enough stock for the couscous to cook, but not to have any left over. I used 1 cup as an approximation--it will change depending on the sort of couscous you use, the ambient temperature and other variables. I would add a little stock, and see how it does--if it quickly absorbs into the couscous, then add more. The important thing is to stir constantly, so the couscous does not burn. 

In a braising pan, add a swig of olive oil, enough to thinly coat the pot. Add the Merguez sausages and continue to stir fry. As you cook the sausages, some of the harissa and other spices will bleed out onto the pan. this is good! 
As the sausages start to bleed, add the butter and let it melt. 

Once the butter melts, add the onions and stir fry them for a minute or so. 

Add the harissa tagine spice or chili pepper and  and stir to incorporate the spices into the onions. 

Transfer the cooked couscous to the braising pan. 

Add the cumin, coriander and black pepper and give it a good stir.  

Garnish with parsley, cilantro and Moroccan preserved lemons. 


Tuesday, June 5, 2012

Pan Fried Southern Chicken

I found some delicious chicken drumsticks on sale. I was wondering what I could do with them. Ordinarily, I would make Malu's Chicken Curry out of drumsticks, but I wanted to try something else.

We don't have television in our house, but when I was home for Thanksgiving a few years back, I watched the Food Network. Alton Brown had a show about Southern Fried Chicken, which looked absolutely delicious! I kept that stored in the back of my head.

When I saw the drumsticks, that memory came back and I decided I was going to make fried chicken!

Now, I tried making fried chicken once before, about a year ago. It was a disaster! I burned my hand with the hot oil (ouch!), the chicken turned out burned on the outside and raw on the inside. I had to decrease the temperature of the oil to compensate, and leave the chicken in longer. In the end, we ended up going to Church's Chicken for dinner. It was a bitter defeat!

So, I licked my wounds and buried my desire for fried chicken deep within me. A few months ago for work, I went to New Orleans and Atlanta and had my fill of southern cuisine. They really know how to fry chicken in the south! A few months passed, and my desire for homemade fried chicken grew once again. I decided to step into those waters again, but this time, I would not be defeated!

I went to YouTube and found the episode of Good Eats with Alton Brown about the fried chicken. I watched it maybe 3 or 4 times...Its not a terribly complicated recipe, but it does require strict protocols being followed. Don't skip any steps or skimp on equipment! You can find his recipe on The Food Network.

Special Equipment
3 plastic rectangle containers for marinating and dredging
You will need one container to marinate the chicken in buttermilk. You will need a second to roll the chicken in spices and a third to roll the chicken in flour.


A colander 
You will need this to drain excess buttermilk off the chicken.


A good cast iron skillet
This is key, as teflon coated pans are too thin and don't distribute the heat evenly. I was tempted to use my trusty wok, which I have fried wontons and other lovelies, but the round bottom of the wok prevents the chicken from getting the nice brown spots on it. Go classic and you can't go wrong!

An oil splatter screen
A fryers best friend! You are going to be putting cold chicken in hot oil. Oil will spatter. If you don't want to visit your local hospital's burn unit or spend the rest of the week cleaning up cleaning up oil from every surface in the kitchen, invest in an oil splatter screen. I got a set of 3 from Bath Bed and Beyond for $9.

2 cookie cooling racks
You will need the chicken to rest twice during this process: once after its flour dredging and once after you fry it. When I was in college, some of my roommates would make fried chicken and put it in a paper bag afterwards to eliminate the excess oil. The problem was that the hot oil would stick to the paper bag and some of the tasty skin would peel off! What a waste!

I only had 1 cookie cooling rack. So, I used the rack from my toaster oven as my second rack. It was smaller, so I used it to place the fried chicken on it.

Meat Thermometer
This is a "nice to have" item for measuring the temperature of the oil and the internal temperature of the chicken. When I was frying my chicken, I didn't have one, so I had to just to "eyeball" it. For the oil, that was not so difficult, but for the chicken is it really hard. In the end, I had to cut into the chicken with a knife to confirm that it was cooked thoroughly. Ironically, I got a meat thermometer for a wedding present the next day!

3 sets of tongs
You will need two for handling the raw chicken and one for handling the cooked chicken. Salmonella is a very serious concern when dealing with any chicken recipe, and especially so when you are dealing with fried chicken. If they are metal tongs, be sure there is some sort of heat protection on them, as they will conduct heat as you put them in the oil. I only had one set of tongs, so I used my trusty ryoribashi-super long Japanese chopsticks used specifically for frying tempura and other lovelies. I used the ryoribashi with the raw chicken and the metal thongs for the cooked fried chicken.

A paper paint bucket 
This is a "nice to have" item. I didn't have one so I stored my fried chicken in a plastic container. The paper bucket will absorb some of the excess oil on the chicken. You can pick them up at any paint store or hardware store.

Cristco or vegetable shortening
This recipe calls for vegetable shortening instead of vegetable oil to fry with. When I had made the chicken previously, I ignored it and went with vegetable oil. It didn't work out right. I think it is because of the difference in frying temperature between the two. Stick with the recipe and vegetable shortening.

Ingredients
1 broiler chicken, cut into 8 pieces (or 8 chicken wings, drumsticks, or breasts). I just had 8 drumsticks
2 cups lowfat buttermilk
1 tablespoon kosher salt (Alton Brown's recipe calls for 2 but I found it too salty for my taste)
2 tablespoons Paprika
2 teaspoons garlic powder
1 teaspoon Ras El Hanout or cayenne pepper
Flour
Cristco or other vegetable shortening (around 10 spoonfuls)

Procedure
Place the chicken in a plastic container. Cover with buttermilk. Cover and refrigerate for 12-24 hours. Turn it once during that time to ensure it coats evenly. I went for the full 24 hours, and I think it made a big difference.

Remove the chicken from the refrigerator after the allotted time period and set aside. You don't want the chicken super cold when you fry it. By leaving it out for 10-20 minutes as you prepare everything else, it will slowly come up to temperature.

Set up your stations.

From right to left: Spice rub station with tongs, Flour dredging station with ryoribashi, Resting station with grilling tongs, and Frying station with cast iron skillet and oil splatter screen
Station 1: Chicken drain
I make station 1 in the sink. My sink has 2 compartments. Place a colander in one compartment. Pour the chicken and the buttermilk into the colander and let it drain. Take the dirty plastic container (with all of its raw juices) and place in the second sink compartment for washing later on.

Station 2: Spice rub
Combine the salt, paprika, garlic powder, Ras El Hanout (or cayenne pepper) and mix in one of the plastic containers.

Station 3: Dredging
Pour flour into a plastic bin for dredging. Place to the left of the spice rub container.

Station 4: Resting station
Take a cookie sheet with a cooling rack and place it to the left of the dredging station.

Station 5: Frying Station
Use your cast iron skillet with Cristco

Station 6: Fried Chicken draining station
Take another cookie sheet with a cooling rack and place it to the left of the frying pan. This will be for the chicken after its fried. This will allow the chicken to cook while it is out of the oil, and allow the chicken to cool so you can eat it!

Directions
Place the chicken in a plastic container and cover with buttermilk. Cover and refrigerate for 12-24 hours (24 hours is better).

Station 1: Chicken drain
With a pair of thongs, remove all of the chicken and place in the colander in station 1. Let any excess buttermilk drain off into the sink.


Station 2: Spice rub
Using the same pair of thongs, transfer one piece of chicken at a time to the spice rub at station 2.

Gently roll the chicken so it is completely covered in the spice rub.

At this time, melt shortening on low heat. You will need the melted shortening to come up to 1/3 inch up the side of a 12 inch cast iron skillet (I used 10 spoonfuls of Cristco). Once the shortening has melted, increase heat till it comes to 325 F. Do not allow the heat to come above 325--the shortening will break down chemically and taste bad. Check the temperature of the shortening regularly with a thermometer. Do not allow the temperature to exceed 325 F.


Station 3: Flour Dredging
With a second pair of thongs or chopsticks, transfer the chicken to station 3: flour dredging. Again, gently roll the chicken so it is completely covered with the flour. If you have a container with a lid, you can put the chicken in, close the cover, and give it a good shake. This is an important step-if you reversed these steps (flour then spices), the spices would burn, give the oil the wrong flavor and eventually burn your oil. I used a spoon to sprinkle flour on the hard to reach places of the chicken.


Station 4: Resting
Remove the chicken from the flour dredge and place on a cookie cooking sheet. Give it a good tap or two to remove any excess loose flour--that will easily fall off and start to burn your oil. Let the chicken rest for 2-3 minutes.


Station 5: Frying Station
Once your oil is hot enough (325 F), gently add the chicken. The center of the pan will be the hottest, and the outer circumference will be slightly cooler. If you have a variety of chicken pieces (breasts, drumsticks, wings, thighs), place the chicken thigh in the center, and the drumsticks around the circumference. If you have all the same pieces, spread them around the circumference of the pan at 11am, 1pm, 5pm and 7pm and one in the center. Keep in mind the one in the center will cook faster.


Be careful as you are adding the chicken to the hot oil-Gently and carefully add one piece of chicken at a time. You might get some oil sputtering and you don't want any oil spilling out of the pan. I used my oil spatter screen as a shield from the oil. I had a friend who burned their foot really bad because they added the chicken haphazardly and it splattered on their bare foot. Ouch!

Place the oil splatter over the pan and cook until golden brown on each side, around 10-12 minutes. After 10 minutes on one side, check it with your meat thermometer. The internal temperature of the chicken must be around 180 degrees. The meat should have a nice browning on the side that was in the oil, a dark reddish hue, like in the picture below:


Station 6: Fried Chicken draining and cooling station


With a separate clean pair of thongs, remove the cooked, fried chicken from the oil and place on another cookie cooling sheet. Be sure that there is parchment paper or something to collect the excess oil and fried crumbs that will fall off.

Allow the chicken to cool before eating. I had mine about 10 minutes after frying--I couldn't help myself. It was still super hot, but tasty!


Fried Chicken also is great cold! Store in a paper paint bucket or plastic container.


After you are done frying the chicken, remove the oil from heat and let it cool slightly. Once the oil has cooled, but not turned solid, carefully strain the oil and put into a glass container. Alternatively, let the oil cool overnight. The next day, put in on a burner and gently heat, until it melts. Then strain and store in a glass container. Use it later for different dishes...the grease is great for cooking eggs with.


Monday, June 4, 2012

Moroccan Fish Tagine with Coriander Couscous and Moroccan Preserved Lemons

I made my Moroccan preserved lemons and I was dying to try them out in a new recipe!

I stopped by the Oaktown Spice Shop. This place is amazing!! They have all sorts of delicious spices and even more exotic ones. I was in Seattle a few months ago and visited 2 spice shops up there. Robyn and I were thinking: How comes the Bay area doesn't have a spice shop? Looks like I missed the business opportunity!

The owner, John, has a wide variety of spices. I was impressed. He also has a treasure trove of knowledge about spices, and what spices work with what dishes. Most importantly, he makes his own proprietary blends.

I purchased one of his blends for a Moroccan fish tagine and it was fantastic! I think it was mainly harissa, but there were other lovelies in there as well.

If you live in Oakland, do stop by. Its a real experience!

Ingredients
1 lbs 2oz mixed fish (I used Mackerel, but Monkfish would work too), scaled, cleaned and deboned
1 tablespoon Harissa or Moroccan Fish Tagine Mix
1 red onion
2 garlic cloves
2 tablespoons of walnut oil or some other nut based oil
1 teaspoon cumin seeds
1 teaspoon ginger, chopped
1 cinnamon stick
1 Moroccan preserved lemon, chopped  (about 3 spoonfuls)
12 green olives, pitted and roughly chopped
1/2 cup white wine
3/4 cup fish stock
1 pinch saffron
1 handful cherry tomatoes, chopped
Fresh Coriander
Freshly cooked Israeli Couscous

Wash the fish and sprinkle with the Moroccan Fish Tagine Mix or Harissa. Set aside and let it marinate in those spices for a few minutes.


In the meantime, take the onion and quarter it. Remove the skins from the garlic. Place the red onion and garlic clove in a food processor. Give it a few pulses, until the onion is diced fairly evenly.


Heat the walnut oil in a dutch oven or tagine. Gently cook the onion and garlic until soft.


Add cumin, ginger, cinnamon stick, preserved lemon and green olives. Stir fry for 2 minutes.

Add the harissa or Moroccan fish tagine mix and cook for 1 minute.


Add the wine, fish stock and saffron and bring to a gentle simmer.

Add the fish and stir fry for a few minutes, allowing the fish to break up into chunks.

Add the cherry tomatoes and season with salt and pepper.

Garnish with Fresh Coriander and Moroccan Preserved Lemons.

Serve with freshly make Israeli Couscous.

Enjoy!


Moroccan Preserved Lemons

These Moroccan Preserved Lemons are delicious! They really add a new layer to Moroccan cooking, and are great to add to salads and other dishes. They have a very unique flavor and a silky smooth texture that really cannot be beat.

I have always had an illicit love affair with lemon pickles. When I was growing up, one of my favorite dishes was South Indian Red Lemon Pickle with rice. That's it. Just rice and red lemon pickle. I could eat that everyday! As a kid, all the lemon pickle I has was flavored with chili powder, making it very tasty, but also very red. In our house, red pickles were the pickles du jour: red mango pickle, red lemon pickle, red gooseberry pickle....the list goes on and on. Fiery hot and spicy, these pickles really punch up the spice factor on any dish.

When I was working in South India, I visited my aunt and uncle. They make their own pickles, and I was powerfully impressed! They have this white lemon pickle that was out of this world. Obviously, freshly made home pickles will always beat anything store bought. Hands down. But these were especially good! Tart, tangy, slightly salty, slightly spicy, it is one of the rarest forms of pure pleasure in this world. My aunt gave me one fairly large bottle of lemons, which I had judiciously used over the past several years (yes they can last that long!).

My supply of lemon pickle was running low, and I was getting desperate. I would anxiously comb Indian stores in Berkeley, Fremont, Pleasanton...anywhere there was a reasonably large contingency of Indians, I figured somewhere there would be a store that sold White Lemon Pickle.

Alas, there was none. Returning home empty handed on several occasions, my hopes all but dashed....Enter.....The Pop Up Grocery Store????

Robyn and I participated in a "Pop Up" grocery store here in Oakland. A variety of local food merchants would gather at a predetermined location, set up shop ("pop up") and sell their wares. We got a small bottle of Moroccan preserved lemons made by a company called Studebaker Pickles. I had the pleasure of meeting the owner at the Eat Real Festival in Oakland this past weekend. Perhaps the company is in reference to drying out goods in an old Studebaker? Anyways, their Moroccan pickles are amazing! It wasn't the same flavor profile as South Indian white lemon pickles, but they were delicious in their own right!

This was the closest thing I could find to my aunt's South Indian White Lemon Pickle. I figured it was a poor substitute, but it would have to do.

I was pleasantly surprised by the flavor! They are absolutely delicious! Made with star anise, bay leaves and red chilies, it was tart and tangy, with a pleasant spiciness. Looks like I found a new addiction!

I gobbled it all up and used it for most of my South Indian dishes. It gave the dishes a slightly different flavor profile, which was..shall we say "interesting"? It really shone when I was making some North African dishes, which I think is most appropriate! Preserved Lemons are really indispensable to Moroccan cooking. They had such flavor and dimension to a dish.

My supply was running low, and I was quickly becoming a lemon pickle addict. I needed a new resource, but couldn't find any anywhere....Fortunately, one of Robyn's coworkers has a lemon tree and one day Robyn came home with an entire grocery bag of lemons! These were huge lemons, they did not have much juice to them, but they were really big. What a boon!

If life give you lemons, make....Moroccan Preserved Lemons?? Yes!

Desperation forced me to look elsewhere. I scoured the internet for a recipe for Moroccan Preserved Lemons. I talked with my cousin (my aunt's daughter) to get my aunt's recipe for White Lemon Pickle and compare it to recipes I was finding for Moroccan Preserved Lemons.

This recipe comes from Paula Wolfert's book  Couscous and Other Good Food from Morocco, which I found this recipe on Epicurious. Its really quite good. The hardest part about making these lemons is having patience not to eat them before they are cured. You also will need lots of lemons. The ones I got from Robyn's coworkers were huge! I had never seen lemons that big. They didn't have much juice in them. Researching this recipe, I discovered that Moroccan lemons are smaller and much juicer than their American cousins. I think Meyer lemons would work great in this recipe, but I had big lemons.

The key to this recipe is to be certain that the lemons are completed submerged in the salted lemon juice. Sometimes, you will see some sort of white substance on the lemons. Its perfectly harmless and natural. You can wash it off if you want to, but eating the lemon that way is fine.

Once you make enough of these, keep a jar of the used pickling liquid around. When you are making other dishes that require lemons, wash the lemons and use the lemon as required by the recipe. Take any remainder of the lemon, cut it up and add it to used pickling liquid.

When removing the lemons from the jar, use wooden chopsticks or a wooden spoon.

The whole idea behind pickling is so you don't have to refrigerate the pickles when they are done. I keep mine in the fridge, simply because I don't have enough counter space to keep them on my kitchen counter!

Ingredients
5 lemons (preferably Meyer)
1/4 cup salt

Pickling Spice Mixture
1 cinnamon stick
Cloves
Coriander seeds
Roasted black peppercorns
Fennel Seeds
3 Star Anise
2 bay leaf
Smoked Spanish Paprika
Freshly squeezed lemon juice

Special Equipment
1 sterilized large Sealed Glass Jar (dishwasher safe)
Tongs
1 cookie tray with cookie cooking rack
1 large pestle

Meyer lemons really make this dish! I used lemons from a friend's tree, I don't know the variety. They were rather hard, so I needed to use more salt, and really smash them down with a pestle.

Procedure
Sterilize your jar. This is important, because you don't want any bacteria inside the jar eating away at your lemons! You want a glass jar (not plastic) and you want it to be dishwasher safe. A large pickling jar is best.

Take a large stockpot and add some water to it. Bring it to a boil, reduce heat and place your pickling jar upside down in the pot. Place the top on the stockpot and steam for 10 minutes.
Wrap rubber bands around the ends of a pair of thongs (for a better grip) and place on a clean cloth dish towel upside down.

Quarter the lemons. I cut the lemons in half lengthwise, and then cut each of those halves into 4 quarters.


Place a cookie cooling rack on top of a  a cookie sheet. Place the lemons on the cooling rack. Generously sprinkle salt over all the lemons, and let sit uncovered for at least overnight, but ideally for 24 hours. You will see some of the lemon juice has drained out of the lemons and collected in the cookie sheet.


Make your spice mixture. I dry roasted coriander seeds, black peppercorns and the fennel seeds and let them cool in a bowl. I then added cloves, star anise and bay leaves to the bowl.

The next day, set up your lemon station. Place the cookie sheet with the lemons and thongs on the left side of the counter. Next to the lemons have a small bowl with your pickling spices and a spoon. Place the pickling jar next to the spices. Have your paprika handy there. On the far right, place a large pestle for pressing down the lemons on top of a clean cloth or paper towels.


Place a tablespoon of salt at the bottom of the glass jar. With the tongs, add 3 or 4 lemons to the jar. Add a sprinkle of salt and some of the additional spices and paprika. With a large pestle, smash the lemons down (they should be fairly soft already from the salting of the previous night). You can be fairly abrasive here. The lemons I used had a fairly tough skin (even after bathing them in salt overnight). So press hard. Its okay if the lemon breaks into pieces or cracks a bit. By pressing the salt and other spices into the lemon flesh, it will help break it down.

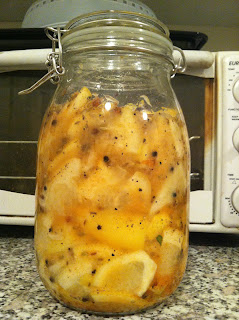
Once you have the bottom layer of the jar filled with lemons, take 1 cinnamon stick and press it into some of the lemon peel. Can you see the cinnamon stick in the picture? It is almost fully buried by the lemons!


Continue to add the cut lemons to the jar with the thongs, following the same order: lemons, salt, spices, paprika until the cinnamon stick is fully covered by at least one layer of lemons.

Once the cinnamon stick is fully covered by a layer of lemons, continue to add more of the lemons to the jar, following the same order:  lemons, salt, spices, paprika. However, from here on out, after you add a layer of spices,  press the lemons down with the pestle (you don't want to do that earlier because the cinnamon stick would get in the way). Just repeat it like a mantra: lemon, salt, spices, paprika, press. Lemons, salt, spices, paprika, press.


Continue to add more lemons to the jar, until it reaches the top. You will want to have a good 2 inches of space at the top of the jar. This is for 2 reasons. First, the salt is going to start reacting to the lemons, drawing out the juices of the lemons. As it does this, the liquid level will start to rise in the jar.


Second, as you continue to use lemons for different recipes, you can add the skins to the jar instead of throwing them away. Awesome!!! As you can see, as I used lemons for different recipes, I added the rinds to the jar, filling it to the top. This was a mistake--you really need to have some space at the top, because those lemons will bleed juice.


The next step is the hardest. Let the lemons just sit and stew in their juices for the next 30 days. I put a PostIT note on my jar for the day I pickled it. You want to place the pickles in a warm place with lots of sun (Morocco is a warm place after all!). You can flip the jar upside down once a day to distribute the spices. I didn't, because my jar had a slight leak in it! You will notice that the lemons start to bubble up, creating a foamy liquid froth. Don't worry, its all part of the process.

After 30 agonizing days, you are set to eat your lemons!

You don't need to refrigerate these lemons, as the salt preserves them. Just always be sure that the lemons are completely submerged in the salty liquid.

Since I had a whole jar, I started in on a new jar. This time, I am just using a smaller tomato sauce jar. I added alot of salt, and some of the spices (cloves, coriander seeds, fennel seeds) to the mix. They are beginning to smell wonderful! Every time I juice a lemon, and I have the rind left over, I add it to this jar, which is just sitting out on my kitchen table. We shall see what happens to them...

Enjoy!!!


Thursday, May 31, 2012

Lamb Barbacoa

Mixed with peach salsa on Paratha
It has been cold here in Oakland the past couple of days. I decided to use the slowcooker to make a nice hot meal.

I found a recipe for Beef Barbacoa on The Kitchn a blog I follow.  This was super simple and turned out delicious!

I had gotten some lamb neck at the farmer's market in Marin, so I replaced the beef with lamb neck. The only problem was the recipe called for 5-7 lbs of beef, and I only had 1-2 pounds of lamb neck. In my infinite wisdom, I did not decrease the chipotle peppers and instead added the whole can! Big mistake! It was so spicy my colon was begging for mercy!

I ate the barbacoa that night with lots of good rustic wheat bread to soak up some of the spice.

After burning a hole through my colon, I decided to dumb it down a bit. I roasted a chicken and shredded the chicken meat off of it, and added that to the lamb...Ah, much less spicy, but it still packed a spicy and delicious punch.

I made some fresh tortilla with duck fat and peach salsa and ate this barbacoa with that! It was delicious!

Even with just the one pound of meat, it took Robyn and I a week or so to get through it. I got 5 distinct meals out of it, stretching this one dish out for a whole week:

Lamb Barbacoa with bread (1st night)
Lamb Barbacoa with tortillas and peach salsa (2nd night)
Lamb Barbacoa with Paratha (3rd night)
Shredded chicken with Barbacoa sauce and Paratha (4th night)
Spicy tomato sauce (5th night)


The 2nd night, I chopped up some peaches, tomatoes, red onions and lime juice for a quick peach salsa and had it with green chili tortillas.

The 3rd night, I cooked up some paratha and then used the meat as a filling for that! What a delicious combination! Indian and Caribbean!

The 4th night, I roasted a chicken and shredded some meat off of the chicken and combined it with the remainder of the sauce. I then used the chicken as a filling for tacos.

The 5th night, I took the remainder of the sauce and added it to tomato sauce which was very delicious!

Oh my god I just thought of another use: mix it with shredded chicken and use it as a filling for tomales!


4 Chipotle peppers (from a can), plus all the adobo sauce it sits in
1 bunch cilantro, chopped
1 red onion, peeled and cut into large chunks
1 head garlic, peed and cloves smashed
5-7 pounds of beef brisket or lamb neck
2 teaspoons ground cloves
1 tablespoon kosher salt
Juice of 4 limes
1/2 cup cider vinegar
4-6 cups  rick dark chicken stock or lamb stock
5 dry bay leaves
Peach salsa
Paratha or tortillas

Chuck the chipotle peppers, cilantro, red onion and garlic in a food processor for a few pulses, until the ingredients are combined, but retain some of their texture.

Add the meat (beef or lamb) to the bottom of the slowcooker. Pour the chipotle/cilantro/red onion mixture on top of the meat.

Add the cloves, salt, lime juice, cider vinegar and bay leaves.

Add the stock, you want the meat to be submerged in the stock. Put the lid on and cook on HIGH for 4 hours.

I like to prepare everything in the crockpot and leave it in the refrigerator. This way all the spices infuse into the meat and help it break down.  Then, just before bed, I turn the crockpot on.


The recipe on The Kitchn recommends cooking it on HIGH for 4 hours and WARM for for 6-8 hours. I didn't do that--I just let it sit on LOW overnight for 10 hours (I put it in around 10pm, took it out around 8am the next morning). But I was using lamb neck instead of beef brisket, and I had less meat than the recipe required.


Either way, it turned out delicious!


Sunday, May 27, 2012

Cutting a Pineapple

When I was going to school in Hawaii, one of my favorite snacks was fresh pineapple! I went to a party once, and someone had cut up a pineapple in the most fantastic way and sprinkled Li hing mui powder on it. It was delicious!

I never learned how to cut up a pineapple that way until I met Jill. She is a fantastic cook (and came up with the Baked Tofu recipe I use). She cut the pineapple up in such a way to reduce the amount of waste! It was fantastic.

Next time you get a pineapple, try cutting it up this way! Happy eating!


With a sharp knife, start shaving off the top thick layer of skin on the pineapple. The idea here is to minimize the amount of sweet juicy flesh you cut away, so really go thin! As you cut, you should be able to see "the eyes" of the pineapple.

Once all of the first layer of pineapple skin is off, examine the pineapple. Hopefully, there are no brown or soft spots, indicating rot. If there is a bunch of rot, then you will have to throw the pineapple away! :( But, if there are a few brown spots just carve them out of the pineapple with the knife.

When looking at the pineapple, you should see all the eyes there. Now, those eyes are not very tasty at all, so you will need to remove them. If you look closely, you can see that the eyes of the pineapple line up diagonally cross the pineapple. In the picture to the right you can trace an imaginary diagonal line of eyes from the top right corner of the picture to the bottom left corner of the picture.

Select one of those diagonal lines with eyes on them. Take you knife and turn it so it creates a sharp angle. Make a small incision about a 1/4 of an inch on one side of one or two of the eyes. On the opposite side of the eye, make a similar 1/4 inch incision. Remove and discard that piece of pineapple flesh. The eye should be completely removed, with angled incision marks in the pineapple.


Your pineapple incision should look something like this:


Here is a closeup of the incision:


Continue the process of making small, shallow, diagonal cuts until all or most of the eyes of the pineapple have been removed. Keep the same angle throughout the pineapple. In the end you should get a pineapple which looks like a spiral staircase has been carved through it. It should be free of the tough outer skin and any eyes. It should look something like this:


Here is a closeup of those incision lines. As you can see, all the skin and eyes have been removed, leaving only the soft, sweet flesh with a minimum amount of waste! The diagonal lines combine and form a spiral. 
Cut off the top tall grassy part of the pineapple. Take your knife and position it in the center of the flat top the pineapple. Cut down with a strong powerful stroke, cutting the pineapple in half, lengthwise. You should now have two halves of one pineapple.

The next step is to remove and discard the core of the pineapple. It is hard and somewhat bitter and you don't really want to eat it or cook with it. Flip one of the cut halves, so that the flat part is facing you. The core will be in the center. With a sharp knife, make a deep angled incision across the length of the pineapple on both sides and remove the core. I have been trying to think of uses for the core. Currently, I cut the core into chunks and I am keeping them in a jar with vodka to see if I can make pineapple infused Vodka.

Take the cut pineapple half and cut it into slices. Eat immediately or store in your refrigerator.

If you have fresh strawberries and raspberries, make a berry sauce and serve it with the pineapple for a delicious dessert. I like to sprinkle mine with Li Hing Mui (mentioned above) or chili pepper and salt! Delicious!